WhatsAppキャンペーンを作成する
- Genesys Cloud CX 1 Digital Add-on II、Genesys Cloud CX 2、Genesys Cloud CX 2 Digital、Genesys Cloud CX 3、Genesys Cloud CX 3 Digital、またはGenesys Cloud CX 4ライセンス
- WhatsAppの場合: アウトバウンド> W hatsAppキャンペーン>追加、消去、編集、ビュー許可
- すべてのキャンペーン タイプの場合: アウトバウンド>連絡先リスト>検索許可
- (オプション)すべてのキャンペーン タイプの場合: アウトバウンド> DNCリスト>ビュー許可
- WhatsApp 統合の場合: メッセージング> WhatsApp統合 >追加、消去、編集、ビュー許可
WhatsApp キャンペーンを設定する前に、次のタスクを実行します。
- WhatsApp Messenger の統合を設定します。WhatsAppのセルフサービスオンボーディングプロセスの詳細については、以下を参照してください。 WhatsApp埋め込みサインアップフローの概要。
- 受信メッセージ フローを作成します。詳細については、フローを作成する。
- メッセージ ルーティング エントリを作成し、着信番号を着信メッセージ フローに関連付けます。詳細については、受信メッセージルートを追加する。
次に、このキャンペーン モードに必要なリソースを追加するか、再利用する既存のリソースを特定します。
| リソース | 必須ですか? | 説明 |
|---|---|---|
|
連絡先リスト |
はい |
、連絡したい人のリストを定義するか、既存のリストを使用することができます。 ノート:
|
|
リストに連絡しない |
任意 |
連絡先リストに含まれていても、このキャンペーンでメッセージを送信しない番号のリストを定義します。詳細については、新しい内部DNCリストを作成する。 |
|
アクセス区分 |
はい |
このキャンペーンに関連付けるアクセス区分を把握するか、既定でホームディビジョンを使用するかどうかを指定します。 詳細については、アクセス区分の概要をご覧ください。 |
セットアップが完了したら、ワッツアップ次の手順に従ってキャンペーンを実施してください。
- 管理をクリックします。
- アウトバウンドのキャンペーン管理をクリックします。
- クリックメニュー>チャンネル>アウトバウンド>キャンペーン管理。
- 選択してくださいデジタルキャンペーンタブをクリックして新規作成。
- キャンペーン名ボックスに名前を入力します。 キャンペーンの名前にはスペースや特殊文字を含めることができますが、一意である必要があります。
- 選択してください分割または、デフォルトのホーム部門を受け入れます。詳細については、「部門の操作」を参照してください。でアクセス制御について。
- 使用連絡先リストこのキャンペーンのメッセージを送信する連絡先のリストを選択するボックス。リストをフィルターするには、名前のすべてまたは一部を入力します。割り当てできないリストを選択すると、エラー メッセージにその理由が表示されます。次の場合、連絡先リストは無効です。
- リストに定義されている電話番号タイプがありません。
- リストにレコードがありません。
- リストをインポートできませんでした。
- リストを作成したインポートがまだ実行されています。
ヒント: 連絡先リストを作成していない場合は、現在のページから離れることなく実行できます。
-
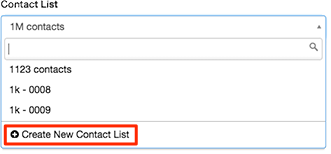
連絡先リスト ボックスをクリックし、 新しい連絡先リストを作成するクリックします。

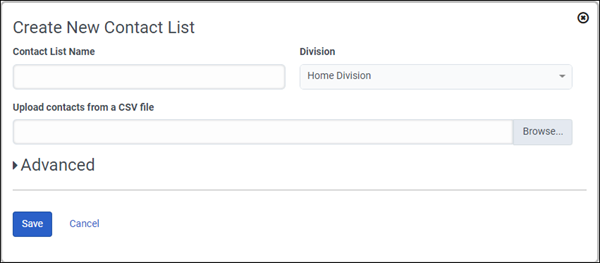
ダイアログボックスが表示され、連絡先リスト名と . csv ファイル アップロードするには :

-
[連絡先リスト名] ボックスに名前を入力し、[参照] をクリックしてアップロードする連絡先ファイルを選択します。 詳細は、「新規連絡先リストを作成」を参照してください。
詳細セクションの試行制御オプションを無視します。 試行制御は音声キャンペーンにのみ適用され、メッセージングキャンペーンには適用されません。 -
保存するをクリックします。
メモ: ラップアップ コードマッピングは、メッセージングキャンペーンには適用されません。 - オプションです。 から 連絡先リストフィルター 」ボックスで、必要に応じて、このキャンペーンで使用する連絡先リストフィルタを選択して、フィルタに一致する連絡先にメッセージを限定します。
 詳細については、Contact list filters view をご覧下さい。
 -
から1分あたりのメッセージ数ボックスに、キャンペーン期間中に 1 分ごとに送信されるメッセージの数を入力します。最大メッセージ制限を超える値を設定すると、エラーが発生します。
- 省略可能です。からDNCリストボックスで、このキャンペーンでメッセージを送信しない電話 ID のテーブルを選択します。リストをフィルターするには、名前のすべてまたは一部を入力します。このキャンペーンは、連絡先リストからメッセージを送信するレコードを選択するときに、このDNCリストのエントリに一致する番号を除外します。割り当てできないリストを選択すると、エラー メッセージが表示されます。次の場合、「連絡拒否」リストは無効です。
- リストのすべてまたは一部にレコードが含まれていません。
- リストの全部または一部をインポートできませんでした。
- リストの連絡方法は電話ではありません。
ヒント: DNC リストを作成していない場合は、現在のページから離れることなく実行できます。
-
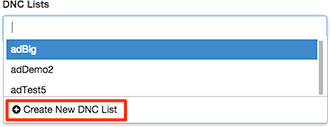
クリック リストに連絡しない ボックスをクリックしてから、 新しいDNCリストを作成する.

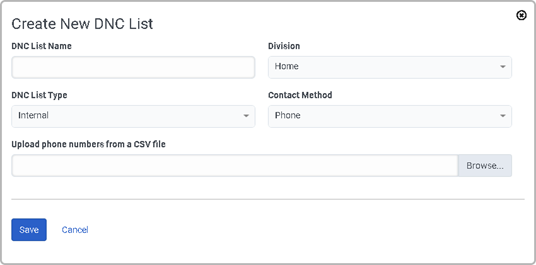
DNC リスト名のダイアログボックスが表示され、 . csv ファイル アップロードします。
-
に名前を入力します。 DNC リスト名 ボックスをクリックして DNC ファイルを選択するには、 参照. .csv ファイルには、電話番号の列を少なくとも 1 列含むことができます。 DNC ファイルには、電話番号のための複数の列と、連絡先名など重複する情報を含むことができます。
例:
Last Name, First Name,DNC_Home,DNC_Cell,DNC_Work
Smith,Bill,317-153-4777,317-981-6233,317-333-2174
Thomas,Terry,424-999-2334,424-384-9993,424-973-8828
Genesys では、.csv ファイルに電話番号の列のみを含めることをお勧めします。
-
保存するをクリックします。
- タイプボックスから、ワッツアップこのキャンペーンで使用されるメッセージの種類として。
- WhatsApp列ボックスから、顧客の連絡先を含む連絡先リスト列を選択します。電話ID 。
- WhatsApp キャンペーン テンプレート ボックスから、WhatsApp キャンペーン テンプレートを選択します。
- WhatsApp 統合ボックスから、このキャンペーンの WhatsApp 統合を選択します。
- オプションです。 有効 常に実行 連絡先リストに連絡先が存在しない場合でも、キャンペーンを継続して実行する場合。 キャンペーンは、レコードが不足しても完了せず、より多くのレコードが追加されるまでアイドル状態になります。 このオプションは、架電連絡先リストの更新が絶えずあるいは動的に行われるシナリオで特に有効となります。
- 省略可能です。必要に応じて、メッセージが始まる前に連絡先リストを列でソートします。たとえば、連絡先リストにAmount_Owed列がある場合、リストを並べ替えて、最も高い金額を最初に支払う人にメッセージを送ることができます。詳細設定 > 連絡先の並べ替えで、連絡先リストの列を選択します。並べ替え。を選択 ソート順:昇順( デフォルト )または降順。並べ替え列に電話番号や金額などの数値情報が含まれている場合は、フィールドは数値です切り替えるはい。連絡先リストの並べ替えはキャンペーンの開始時に行われます。キャンペーン実行中に連絡先を追加すると、新しい連絡先にメッセージが送信されますが、連絡先リストの並べ替えには含まれません。さらに列で並べ替えるには、プラス記号をクリックします。最大4つの連絡先リストの列を並べ替えることができます。最初の並べ替えが最も優先されます。
 注記: 日付列を並べ替える際には、特別な考慮が必要です。mm/dd/yy の形式を使用して日付を表している連絡先列は並べ替えされません。その形式は日付として認識されず、文字列が使用されている列は並べ替えされます。この制限を回避するには、日付を書式設定 ISO 8601 フォーマット (yyyy mm dd)。文字列として見なされるか日付として見なされるかに関係なく、その形式では同じ順序で並べ替えられます。たとえば、クリスマスの日を示すには、12/25/17 ではなく 2017-12-25 と入力します。
WhatsAppキャンペーンの設定が完了したら、保存。新しいキャンペーンはキャンペーン管理ページで利用できます。
- 新しいキャンペーンが最大数の1,000を超えると、エラーメッセージが表示されます。 必要に応じて以前または古いキャンペーンを削除し、 保存 を再度実行して、新しいキャンペーン設定を完了します。
- 通話詳細レポートではなく、インタラクションビューからメッセージングキャンペーンレポートを表示およびエクスポートできます。 メッセージングキャンペーンでは、処理 OUTBOUND-MESSAGE-SENT または OUTBOUND-MESSAGE-FAILED を表示できます。
- WhatsAppキャンペーンのインタラクションの配信状況を確認するには、パフォーマンス>ワークスペース>相互作用。データは[配信ステータス]列に含まれています。詳細については、インタラクションビュー。

