Salesforce メッセージングの外部ルーティングを構成する
- を使用したSalesforceルーティング構成 外部ルーティング ルーティングモデルとして。
- 外部ルーティング設定にリンクされた Salesforce キューと、キューに割り当てられたメッセージング セッション オブジェクト。
お先にどうぞインストールと設定Omni-Channel 外部ルーティング パッケージを使用して、Salesforce でフローを作成し、Salesforce メッセージングを Genesys Cloud 経由でルーティングします。Genesys Cloud はメッセージを適切なエージェントにルーティングして配信します。エージェントは Salesforce 内でメッセージを処理し、メッセージを別のエージェントに転送することもできます。Genesys Cloud for Salesforce は、Genesys Cloud 内でメッセージのライフサイクルを処理し、Salesforce にアクティビティ レコードを作成してすべての重要な情報を記録します。
フローを作成する
Salesforceのフローは、ルーティングプロセスを自動化します。 要素、コネクタ、およびリソースを使用してフローを構築します。 詳細については、 私のドメイン Salesforceドキュメントにあります。
- Salesforceで、を使用してフローを作成します オムニチャネルフロー(ベータ)テンプレート。
- から 設定、[クイック検索]ボックスでフローを検索し、[ 流れ。
- クリック 新しいボット.
- 選択ゼロから始めるクリック次。
- 下すべてのフロータイプ、選択オムニチャネルフローフロータイプとしてクリック作成する。
- キャンバスに要素を追加するには、自由形式。
- 作成するレコードIDそして入力レコードメッセージング セッション オブジェクトの Salesforce ドキュメントで説明されている変数。
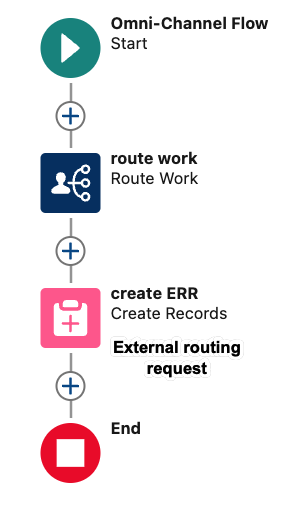
- をドラッグします ルートワーク(ベータ版) アクションをキャンバスに追加し、新しいアクションの値を入力します。
- アクションを与える ラベル と API名 オプションで、 説明。
- 下 入力値の設定 >> RecordID、作成したrecordIdを選択します。
- 下サービスチャネル、メッセージング用に作成されたチャネルを選択します。
- 下 ルートへ、 選択する 列。
- 下列、Genesys Cloud 経由でルーティングする Salesforce キュー ID を入力します。
- クリック 完了。
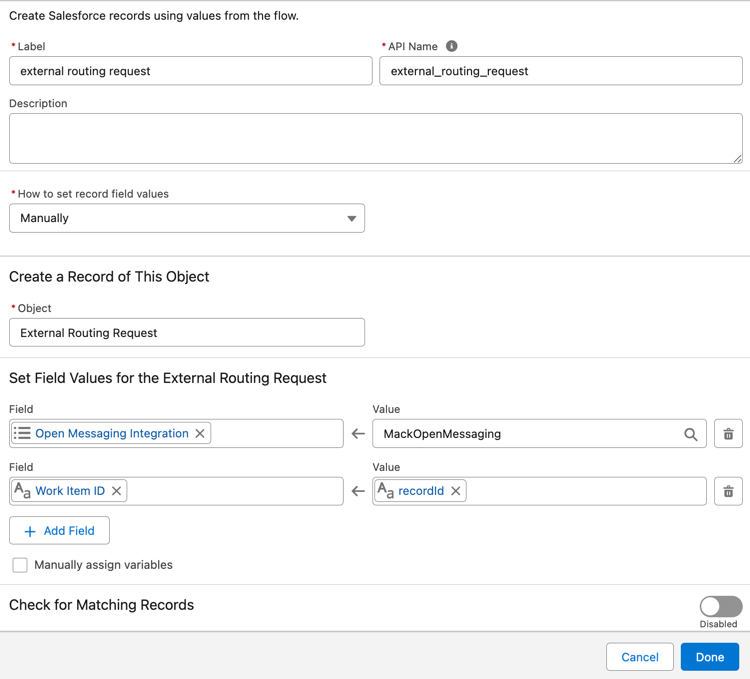
- をドラッグします レコードを作成する キャンバスにアクションを実行し、レコードの詳細を入力します。

-
- カテゴリの名前を入力します。
- オプションを選択手動でレコード フィールドを構成します。
- オブジェクトを選択します 外部ルーティングリクエスト リストから。
- 2つのフィールドを追加します Open_Messaging_Integration__c と Work_Item_ID__c フィールドの値を設定します。
- オープンメッセージング統合– GenesysCloudから取得した選択リスト値を選択します
- 作業項目 ID – メッセージング セッション オブジェクト用に作成した recordId 変数を選択します。
- オプションでフィールドを追加することもできますカスタム属性__cフォーマット内の値は
customAttribute1=customAttr1, customAttribute2=customAttr2。Salesforceオブジェクトを追加する場合は、次の形式を使用します。customAttribute={!Object.Value}。 - クリック 完了。
注記:外部ルーティングパッケージのメッセージ属性を追加または編集することができます。OpenMessageService.apxcカスタム属性を除くファイル、SF_ExternalRoutingWorkItemId。カスタム属性を編集または削除しないでください。SF_ExternalRoutingWorkItemId。見る受信オープンメッセージルーティング パッケージによって参照される API の詳細については、こちらをご覧ください。 -
- 接続します 始める 要素に ルートワーク(ベータ版) フロー内のアクション要素。
- 接続するルート作業アクション要素をレコードを作成フロー内の要素。

- 保存するをクリックします。
- 有効にするをクリックします。
削除リクエストフローをアクティブ化する
外部ルーティングのパッケージには、外部ルーティング要求削除フローが含まれています。 このフローは、次のいずれかが発生したときに作成される要求レコードをクリーンアップします。
- 正常にルーティングおよび完了された、切断された作業項目。
- メッセージがエージェントにルーティングされる前に、ユーザーがメッセージを閉じます。
外部ルーティングを使用する前に、このフローをアクティブにしてください。
- Salesforceセットアップで、 流れ。
- フローのリストで、をクリックします 外部ルーティング要求の削除。
- 有効にするをクリックします。
アプリ内およびウェブでのメッセージングの設定
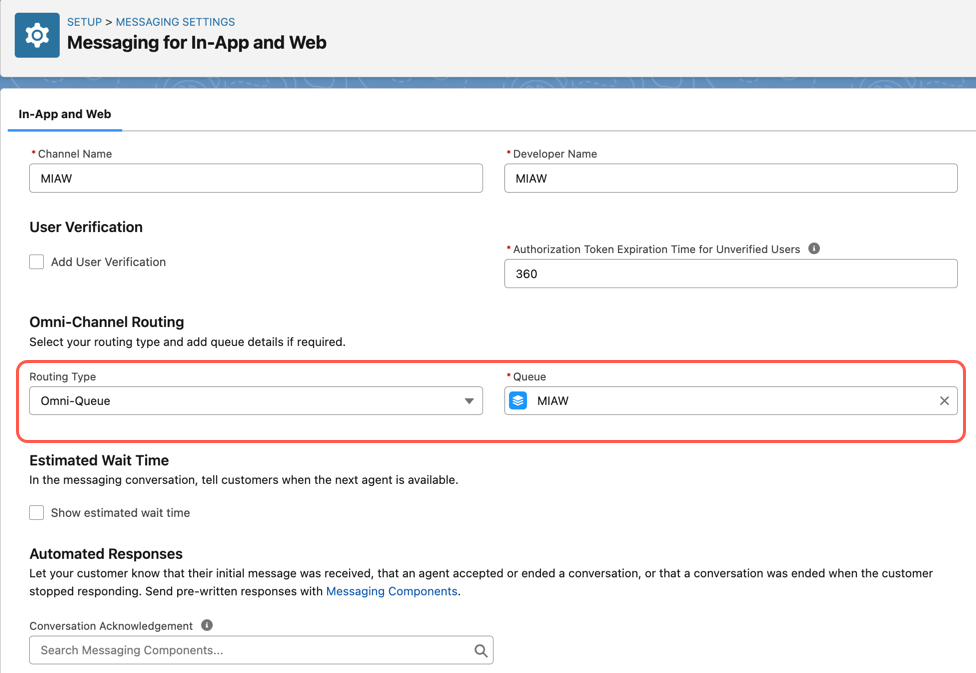
アプリ内および Web のメッセージング用のメッセージング チャネルを作成し、メッセージング チャネルに対して次の詳細が選択されていることを確認します。
- 選択オムニキューとしてルーティングタイプ。Salesforce メッセージングを Genesys Cloud 経由でルーティングするために作成されたフローを選択します。
- アプリ内および Web のメッセージング用に作成されたフォールバック キューを選択します。

組み込みサービスデプロイメントの作成
メッセージング チャネルを作成したら、新しい埋め込みデプロイメントを使用して Web サイトに接続できます。
- デジタルエクスペリエンスを実現します。見るデジタル体験を実現する。
- エンド ユーザーとのメッセージング セッション用の Web デプロイメントを作成します。「アプリ内および Web のメッセージング」オプションとメッセージング チャネルを必ず選択してください。見るWeb 展開用のメッセージングを構成する。
- Web デプロイメントを公開します。
- コードスニペットを追加外部の Web サイトにメッセージを埋め込む。
- ドメインを CORS 許可リストに追加します。
- エージェントにメッセージング コンソールを追加します。見るサービスコンソールにメッセージングを追加する。
チャットボタンを作成する(レガシー)
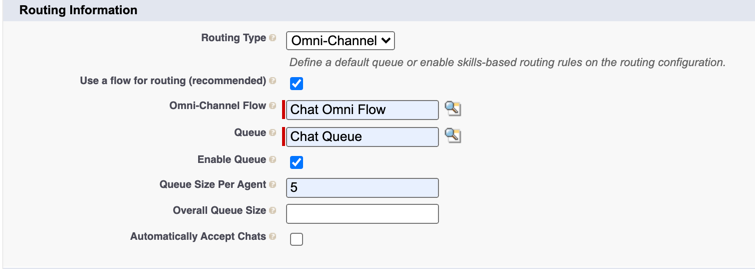
作成するとき チャットボタン Salesforceでは、次のことができます 着信チャット要求をエージェントに送信する方法を指定します。 Salesforceのチャットボタン設定で、 オムニチャネル の中に ルーティングタイプ フィールドに入力し、特定のキューをルーティングするために作成されたオムニチャネルフローを使用します。

オムニチャネル同期設定の使用方法の詳細については、を参照してください。 オムニチャネル同期の使用方法。
統合の詳細については、以下を参照してください。Salesforce向けGenesys Cloudについて.

